
Mastering the art of curling your hair with a curling iron can transform your look from ordinary to glamorous in minutes. Whether you’re preparing for a special occasion or just looking to add some volume and bounce to your everyday style, understanding how to properly use a curling iron is essential. This comprehensive guide will walk you through the basics, from selecting the right tool for your hair type to applying the finishing touches for lasting curls.
Choosing the Right Curling Iron
Understanding Curling Iron Types
Curling irons come in various shapes and sizes, each designed to create different types of curls. The classic spring-loaded curling iron is perhaps the most popular, ideal for beginners due to its ease of use. For those seeking tighter, more defined spirals, a smaller barrel size is preferred, whereas a larger barrel is perfect for loose waves and volume. The wand curling iron, devoid of a clamp, offers a more natural wave, ideal for those with some experience. Meanwhile, the Marcel curling iron, favored by professional stylists, requires more skill but offers unparalleled control over the curl’s formation.
Selecting Based on Hair Type and Desired Style
Your hair type and the style you aim for play crucial roles in choosing the right curling iron. Thicker, coarser hair might require a curling iron with higher heat settings, whereas delicate or fine hair benefits from lower temperatures to avoid damage. Consider ceramic or tourmaline irons for even heat distribution and reduced frizz, especially if your hair is prone to damage or dryness.
Preparing Your Hair
Ensuring Protection and Optimal Results
Before curling, start with clean, dry hair. Applying a heat protectant is crucial to shield your strands from potential heat damage. If your hair struggles to hold curls, a light mousse or styling spray applied beforehand can provide extra grip and longevity to your curls. Detangle your hair thoroughly to ensure smooth curls and easier styling.
The Curling Process
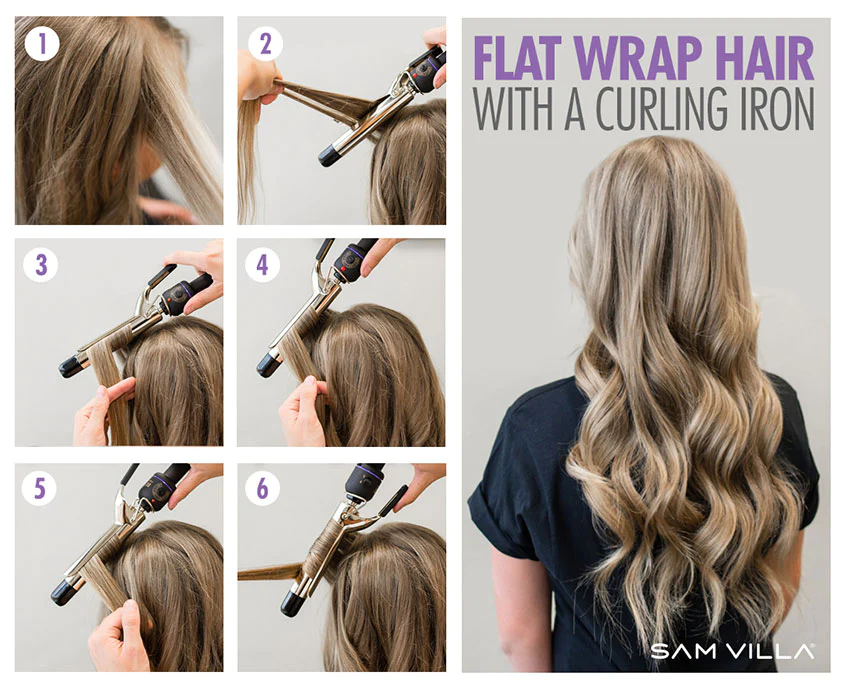
Step-by-Step Instructions
- Section Your Hair: Divide your hair into sections, starting from the bottom up. Clip the upper layers out of the way, working with small sections for tighter curls and larger sections for looser waves.
- Heat Up Your Curling Iron: While your iron heats up, select the appropriate temperature for your hair type—lower for fine hair and higher for thicker or coarser textures.
- Curling Your Hair: Clamp a section of hair about an inch from the end, then roll the barrel up towards your scalp, stopping short of the roots. Hold for a few seconds (the thicker the hair, the longer the hold) before gently releasing the curl. For wand irons, wrap the section around the barrel and hold.
- Direction Matters: For a natural look, alternate the direction of your curls—towards your face and away. This technique adds volume and prevents the curls from clumping together.
- Cooling is Key: Allow your curls to cool completely before touching or styling them further. This step is crucial in setting the curl and ensuring longevity.
Finishing Touches
Enhancing and Preserving Your Curls
Once your curls have cooled, gently run your fingers through your hair or use a wide-tooth comb to break up the curls for a softer, more natural look. Applying a lightweight hairspray will help hold your style in place without weighing it down. For added shine and frizz control, a small amount of hair serum or oil can be applied to the ends.
Tips for Curling Iron Success
- Practice Makes Perfect: Don’t be discouraged if your first attempts aren’t perfect. Curling hair is a skill that improves with practice.
- Safety First: Always use the iron’s stand or a heat-resistant mat to avoid damaging surfaces.
- Maintenance: Regularly cleaning your curling iron will ensure it continues to work effectively and prevents product buildup from transferring to your hair.
Curling your hair with a curling iron can seem daunting at first, but with the right tools, preparation, and technique, you can achieve beautiful, bouncy curls that last. Remember, the key to perfect curls lies in practice, patience, and protecting your hair from damage. Whether you’re aiming for tight spirals or loose waves, this guide will help you navigate the process for salon-worthy results at home.
Read Also: How to Delete an Instagram Account: A Comprehensive Guide