
In the realm of document creation and formatting, Google Docs stands out as a highly versatile and user-friendly tool. Whether you’re drafting a report, preparing a manuscript, or creating a brochure, the ability to tweak your document’s appearance is crucial for both readability and aesthetic appeal. One of the fundamental aspects of document formatting is the adjustment of margins. Margins not only influence the visual layout but also play a key role in preparing documents for printing. This comprehensive guide will walk you through the steps on how to change margins in Google Docs, ensuring your documents meet both your personal and professional formatting needs.
Understanding Margins in Document Design
Before diving into the technicalities of adjusting margins in Google Docs, it’s essential to grasp the importance of margins in document design. Margins are the blank spaces that border the text on every page. They serve several critical functions: enhancing readability by preventing text from cluttering the page’s edge, providing space for binding documents without obscuring text, and contributing to the overall aesthetic and professional appearance of the document.
Moreover, margins can be manipulated to suit various purposes. For example, wider margins might be preferred for documents that are to be bound, allowing ample space for binding without affecting the readability of the text. On the other hand, academic papers often adhere to specific margin guidelines to maintain uniformity and meet submission standards.
Step-by-Step Guide to Changing Margins in Google Docs
Using the Ruler to Adjust Margins
One of the quickest methods to adjust margins in Google Docs is through the use of the ruler feature. Here’s how:
- Open your document in Google Docs: Navigate to Google Docs and open the document you wish to edit.
- Locate the rulers: Ensure that the rulers are visible at the top and left side of your document. If you do not see the rulers, go to “View” in the menu bar and check the “Show ruler” option.
- Adjust the margins: Click and drag the grey area on the ruler to set new margins. The vertical ruler adjusts the left and right margins, while the horizontal ruler adjusts the top and bottom margins. You’ll see the margins adjust in real time as you drag the ruler.
Using Page Setup to Adjust Margins
For those who prefer more precision or need to set margins to specific measurements, the Page Setup dialogue offers a more detailed approach:
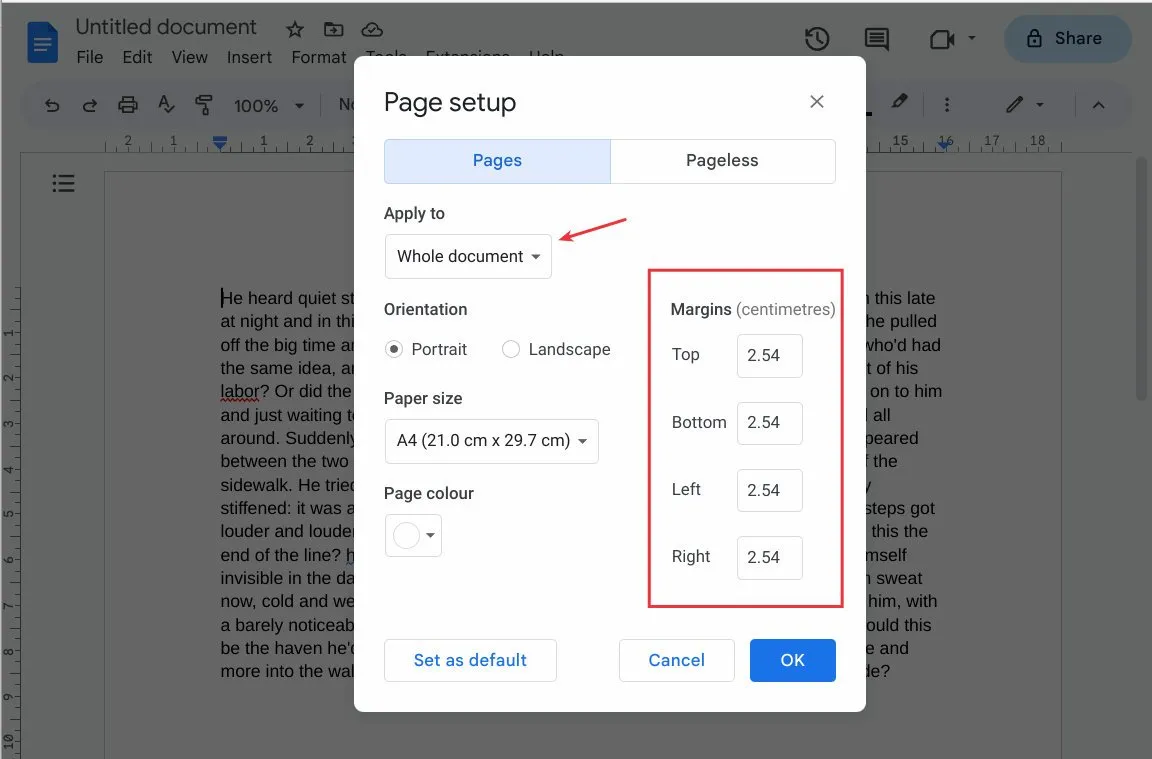
- Access Page Setup: Click on “File” in the menu bar, then scroll down to “Page setup.”
- Set your margins: In the Page Setup window, you’ll see fields for setting the top, bottom, left, and right margins. Enter your desired measurements here. Google Docs allows you to set margins in inches, and the changes can be applied to the entire document or selected text.
- Save your settings: After entering your preferred margin sizes, click “OK” to apply the changes to your document.
Adjusting Margins for Different Sections
Sometimes, you may want to have different margins for different sections of your document. While Google Docs does not directly support section breaks like some other word processors, you can use a workaround by inserting section breaks as follows:
- Insert a section break: Place your cursor where you want the new section to begin. Then, go to “Insert” > “Break” > “Section break (next page).” This will start a new section on a new page.
- Adjust margins for the new section: Since Google Docs applies margin settings to the entire document, to change margins for different sections, you’ll need to adjust the margins manually each time you reach a new section. Remember, this is a workaround and might not be as efficient as using software with dedicated section break margin adjustments.
Tips for Perfect Margin Settings
When adjusting margins, consider the purpose of your document. Academic papers, for example, often require 1-inch margins on all sides, following formatting guidelines such as APA or MLA. For professional reports or proposals, you might opt for different margins to enhance readability or to fit more text on a page. Always preview your document before finalizing it to ensure that the margins look as intended, especially if you’re planning to print the document.
Conclusion
Adjusting margins in Google Docs is a simple yet powerful way to improve the layout and professionalism of your documents. Whether you prefer the quick adjustment via the ruler or the precision of the Page Setup dialogue, Google Docs offers the flexibility to meet your formatting needs. By understanding the importance of margins and how to manipulate them, you can ensure that your documents always look their best. Remember, the key to effective document design lies not just in the content, but in the presentation—and margins play a pivotal role in that presentation.
FAQs on How to Change Margins in Google Docs
1. Can I set custom margins for different pages within the same Google Docs document?
While Google Docs does not support different margin sizes for individual pages within the same document directly, you can work around this limitation by inserting section breaks and manually adjusting margins as you start a new section. However, this method requires adjusting margins each time you begin a new section and is best suited for documents where varying margins are critical.
2. How do I ensure my margins are set correctly for printing?
After adjusting your margins, use the “Print Preview” feature to see how your document will look once printed. This can help you identify any issues with margin settings before the final print. To access Print Preview, click on “File” and then select “Print” or press Ctrl + P (Cmd + P on Mac), which will bring up the Print Preview window.
3. What is the standard margin size for documents?
Standard margin sizes can vary depending on the document’s purpose. However, a common standard is 1 inch (2.54 cm) on all sides. Academic papers and professional documents often adhere to this standard, but requirements can vary, so it’s essential to check any specific guidelines you’re expected to follow.